When the Qt sources were first released on ftp.troll.no, the Troll Tech (mind the spelling, it’s that long ago!) FTP server, many FTP mirror admins quickly started mirroring the software, because it was cool, and useful to them or their company/university. And quite right so, because this meant that everyone in the world could use his local mirror to get their files real fast, i.e. high speed and low latency. However, over time, traditional mirrors were replaced by Content Delivery Networks (CDNs). They were deemed more convenient because, well, the user doesn’t need to look for the his closest mirror. The CDN is a one-stop-shop which will automatically find a fast download location. This can either be done by employing GeoIP, or by performing a distance calculation based on routing information (the users’ ASN). There are even more ways of doing this, but let’s not digress:
During the time at Nokia, the Qt packages were also moved to a Commercial CDN. It was good, but it was also expensive. As an Open Source project, we should use our resources cost-effectively and have an infrastructure that is decentralized to a certain degree. Fortunately there is a software that helps us doing that, by combining the ease of CDN-like user-experience with the old system of FTP and HTTP mirrors, and it’s called MirrorBrain. Happy users include LibreOffice, openSUSE and the KDE Project. MirrorBrain presents itself to the user as one page, redirecting the actual downloads to mirrors. While doing that it makes sure that only those mirrors that contain the latest, up-to-date version of the files will be used.
A Call for Mirrors
Since a few days, we have a MirrorBrain infrastructure in place. If you run a mirror or have a reliable, well-connected machine (>= 50 MBit/s) that can help us delivering Qt (currently a total of 120GB), please read the mirroring instructions on the Qt Project page, send us a mail and join the mirrors mailing list.
Credit where Credit is due
The KDE Sysadmin team has helped us a lot in getting MirrorBrain started while setting up the evaluation system. Peter Poeml, the uberbrain behind MirrorBrain, has been of great assistance. Finally, Digia has been sponsoring the man power to set up the production system.
Klaas explaining cross-device syncing to visitors.Right after the ownCloud 5 release event in Berlin I took the train to Chemnitz to join Klaas in staffing the ownCloud booth, which we shared with the openSUSE folks this year.
Lots of people dropped by to see ownCloud 5, while others were eager to learn about the concepts of ownCloud, or were asking about tips on how to host their files at home or on a self-maintained server.
Snapshot from the buffet.Many were pleased to see the availability of clients across devices. We used a Nexus 7 to demo the Instant upload capabilities for photos, which quickly appeared on the web interface and the desktop folder.
The feedback from existing users overall was very positive, and many were pleased to see the advances ownCloud had made in its evolution. We also discussed sharing questions with users and even managed to do some live debugging, the result of which will soon show up in the next release of the Desktop client.
Me in front of the booth.This years installment of Chemnitzer Linux-Tage was a fun event, not only because of the fantastic show and dinner buffet on Saturday night, but also due to the family atmosphere, and the fun that it was to present ownCloud, but also openSUSE and Klaas’ very own Kraft project.
If you want to meet us again, visit the ownCloud booth at LinuxTag in Berlin from 22.-25. of May.
Arthur giving his overview of oC 5.0 features.On Friday evening, more than 50 people followed the summoning to C-Base in Berlin in order to celebrate the ownCloud 5.0 release, learn about new features and getting to meet some of its makers.
ownCloud server engineer Arthur Schiwon kicked off the talk series with an overview of ownCloud 5.0 features. Only a few minutes after he started, we had to interrupt the talk – the room had gotten too croweded, so we removed some of the desks and sqeezed in another two rows of chairs.
A packed room listens to the talks.Next up was Sam Tuke. He outlined the new encryption system and detailed on how it works with sharing, something the old sharing module fell short at.
After Sam had taken a lot of question from a very interested audience, it was about time for some fresh air and a slice of pizza, kindly sponsored by ownCloud Inc.
Sam talking about the upcoming encryptiion system.After all pizza slices were gone, I concluded the series of talks presenting the ownCloud clients for Android, iOS and Desktop, detailing on new features in the next versions, followed by lots of questions from the audience.
Discussions after the talks lasted past midnight. Finally the three of us as well as Georg Ehrke of Calendar and Contacts fame, who had joined in later, engaged in busy group discusions with the visitors. This way we got to talk face to face with enthusiastic fans, new users and (soon to be) new contributors.
Thanks everyone for joining in. It was an awesome night!
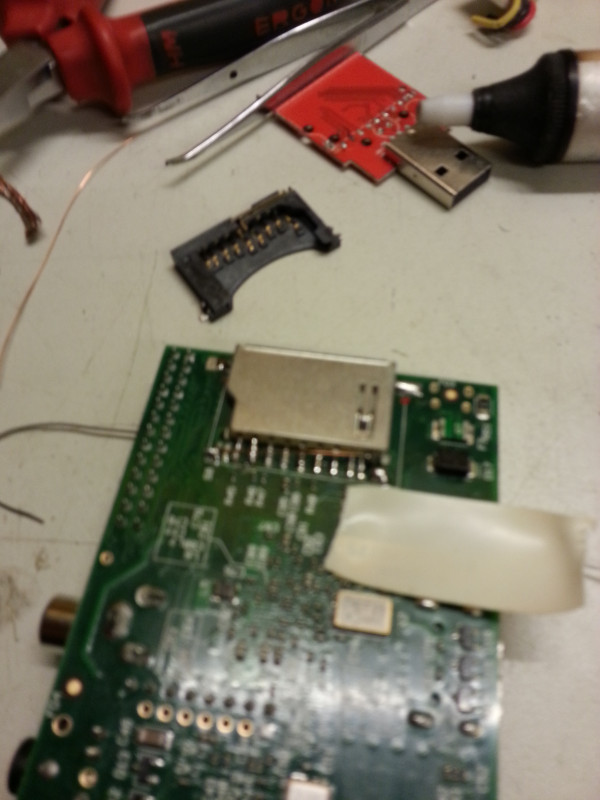
It is is dead Jim: The Raspberry Pi’s cheap SD card reader does not cope well with the leverage effect.A weak spot of the Raspberry Pi board in terms of physical robustness is its SD Card reader: I made the mistake of carrying the Pi around with an SD Card inside, and the leverage forces worked their magic. As a result, the readers plastic framework fractured, and the reader no longer embraced the card safely. This resulted in a behavior that can at best be described as unreliable.
So what should I do? Clearly I could reorder the SD card reader at one of the distributors, but it’s going to be expensive, and, more importantly, it’s going to be the same crappy reader that will most likely break again (unless your learn from your errors, which I rarely do). But the spare part itself is ridiculously expensive, some 6 Euros + shipping just for a spare part.
Provides our spare part: LogiLink Card ReaderCaveats: You should probably not try this as your first soldering project. Find help from someone with expertise.
Note that for simplicity, the new reader will ignore the read-only switch of the SD Card. The respective pads on the PCB will simply be shorted (If you want to go the extra mile, you can of course fix this properly). Also, not every card reader on the market is the same. Check how your reader is connected, and which pins serve which purpose.
Still with me? Well, luckily there is a cheap USB key card reader (affilate link) available which I aquired at at Amazon.de at 2.50 Euros, including shipping. Yes, it’s sad to deconstruct a completely working USB key because it’s cheaper than a spare part, but on the upside you gain a USB connector, an LED and a quartz crystal and a controller as free spare parts for your next projects.
Required Parts and Tools
Ready for unsoldering: uncoated card reader
USB Card reader
Tin-solder
Enamelled Wire
Soldering iron
Desoldering wick
Desoldering pump
Opt: Volt meter
Opt: Pliers
Opt: Wire
Opt: Hot-melt gun
The process
Unsolder new Card Reader from USB Reader
Open the USB keys’ plastic housing by inserting a screw driver into the card slot and turn it by 90 degrees. Once you have gotten hold of the PCB, unsolder the LED and the quartz crystal first – they are in the way. Finally, unsolder the reader pin by pin. Be careful: the pins loosen easily, and if they fall off, you will have to replace them with a piece of wire, which makes the process more difficult.
Unsolder old Card Reader from RPi
Using pliers to cut off the connectors close to the reader gave good results. Use desoldering techniques for proper separation if still required. The more pin wire is left on the board, the easier the resoldering will be.
Resolder new Card Reader to RPi
The SD Card Reader on the Pi is connected via SPI. The general mapping of an SD Card to the SPI can be deduced from pin mapping at Wikipedia. The mapping of the pins remains the same with our chosen reader. However, there are four more pins as you can see from the close up on the right.
Old reader with pin mapping (brand-new Pi board).
As you can see, there are thirteen pins, but there are only nine connectors on the card. We need extra pins for detecting if a card is actually inserted (located on the pins to the right) and another to check if the card is notched (i.e. write-protected, located on the left).
Now we need to map the pin layouts to the new card reader. On our case, the pin mappings are identical. However, the new reader only has eleven pins, but we will be fine – just find the two additional data pins, which set themselves apart from the rest of the pins in height — both are located on the right hand side of the new reader (see the top most picture). The left one is the one you want to solder to to any of the ground pins using the the enamelled wire — we chose the second from the left. Finally, shorten the two left-most contacts pins on the PCB to signal the PI that the card is always on read-write (again, you can easily fix this yourself if you really want your OS to reside on a read-only card).
The result
Raspberry Pi with new, more sturdy SD Card reader. The old reader module and the unsoldered USB key PCB still in the background.
Making it rock-solid
Use some solder to fixiate the reader on the sides, even though the card reader might not have extra spots to hold the solder tin. It will most likely still work. If you want to make sure your reader is really well-tied to the PCB, use a hot-melt gun and put some glue onto the new wiring (check if it works first, there is no going back!), as well as on the sides.
Credits
The project was suggested by and conducted with the invaluable help of @d3rp3t3r.
ownCloud 5 is about to be released – an event that cannot go uncelebrated. Joining events in Nürnberg and Stuttgart, we will have an event for everyone who happens to live in or nearby Berlin and shares an interest in ownCloud. Even though it’s on short notice, make sure to save the date:
We will give an introduction to ownCloud and its concepts, show off new features in ownCloud 5.0 and give some insight into the syncing clients. And yes, there will also be Pizza, sponsored by ownCloud Inc!
If you want to come, please add a comment below to make planning easier. See you there next Friday!