Some Education While Feeding a Code Troll

It doesn’t happen often that i feel inclined to comment on something that is not part of my daily work life. Today, I’ll make an exception because a decent answer does not fit into 140 chars.

It all started out with this post on Twitter that someone in my timeline retweeted:

Note that I’m not a Java developer (but write a lot of C++), and I’m not going to defend the language. However, I think this post delibrately deceives people instead of educating them. This is what this post tries to compensate for.

To make things a bit more interesting, I’d actually like to start with the last example, going up in the reverse order:

int q = 022 - 2;
> 16 // because fuck math

This is simply a matter of notation. Any C-style language I am aware of (and Java clearly uses C traits in many ways), uses the following conventions for integer literals:

aa // 10-based
0aa // 8-based (octal)
0xaa // 16-based (hexadecimal)

where ‘aa’ represents a number. You can complain and moan about it, or simply accept that even today many people still use that kind of notation, at least the hexadecimal representation. In case of Java, it would be simple enough to make the IDE or Linter warn about the octal notation, should studies show that it does more harm than good. Anyway, a well accepted idiom among developers of C-style languages, and “Fuck math” is a clever deception to trick you into thinking it was a compiler bug.

Next, we see this:

(byte) + (char) - (int) + (long) -1;
> 1 // I'm not sure what this even means

Squeezing language features into one line in an unusual way and then complain about it is possible in any language. The real learning value lies in the answer to two questions:

1. What are we looking at (i.e. what does it mean)?

We are looking at a number of casts. In C-style languages, a cast is a way to tell the compiler that I want to convert a value. Some casts have to be explicit, for some it’s optional. In this case, it’s pure mind-fuckery.

The way your mind needs to parse this is like the compiler would do: from right to left.

2. Why is the result 1?

We start with -1, which would be an integer in Java. We cast it to a long integer, but the value is still 1. Effectively, the compiler is now looking at this:

(byte) + (char) - (int) + (-1);

So we simply cast this back to a normal integer:

(byte) + (char) - (-1);

This is where first-grade math kicks in and we get

(byte) + (char) + 1;

The next two casts simply convert it to char and to byte. So after two more casts, we end with this:

1;

For the simple example of 1, the data type does not matter. Even a boolean could hold it. If you are interested into what kind of numbers integer, long, char and byte can hold, check Oracles’ data type reference.

Which brings us to closer to the really interesting case, by looking at the second example:

Integer.valueOf(1000) == Integer.valueOf(1000)
> false // WTF?

This is caused by a decision that I cannot really comprehend: Sun decided to introduce an Integer class that wraps ints to support Generics, instead of adding support for non-class data types (sometimes called Plain Old Data types, or PODs), like C++ does:

std::list<int> myIntList;

Instead, in Java you have to use

List<Integer> myIntList;

Usually, that’s not a problem, as ints get transparently wrapped into Integers (appropriately called ‘boxing’), so you shouldn’t have any dealing with the Integer class outside Generics.

But even if you choose to be ignorant about that, or simply don’t know better, the == operator should sound every last siren in your brain, because in Java, there is no operator overloading.

This means that whenever you compare two Objects (Integer.valueOf() will return an object of type Integer), it will always compare the addresses of the objects, rather than any of the values that it might hold. Of course, addresses of two distinct objects are not the same, even if their value is. The correct way would be to either use straight int‘s, or use the compare() method, which is recommended for comparing value type objects in Java.

So why on $deity‘s earth is this happening?

Integer.valueOf(6) == Integer.valueOf(6)
> true // Of course

If you’ve paid attention so far, you will realize that the comment is again deceptive. It’s the only actual WTF here, should you choose to not have read this post for the occasional chuckle.

We just learned that Java’s == operator compares object addresses. I was briefly puzzled by this, but then theorized that the only logical solution is that the implementation of valueOf(int) must have some kind of cache. And indeed, a look at the Java source code reveals that the real solution is indeed close.

Java provides a cache for number Objects with values from -128 to +127. This means that the addresses for objects created from integers within this range will always result in true.

Again, your Linter or IDE should warn about both of the above.

Conclusion

I hope I was able to show that sometimes, there is more to seemingly weird code snippets than meets the eye. It’s usually worthwhile to lean back to try and understand some of them, and then re-evaluate your assessment on whether or not you like a given language. So again, this is not in defense of Java. Also, a tip of the hat to the author of the code for identifying these interesting language quirks.

ownCloud @ FrOSCon 2013

frosconBjoern and I attended FrOSCon, the Free and Open Software Conference, a major FOSS-Event in Germany, which took place August 25th and 26th.

We had a booth, showing off ownCloud, as well as the Beta of the Desktop Client 1.4.0, and giving away leaflets, pins and t-shirts. The huge interest reflected in the fact that we didn’t even get to take a picture if the booth. If you have one, let us know ;-).

We'll make sure to be back!
We’ll make sure to be back!
The traffic at the booth stood proof to the vast interest in ownCloud: People literally queued up to ask questions or voice suggestions, especially after Bjoerns talk in the main lecture hall, which was well received and will shortly be available online.

Next to discussing with visitors, many of which were already actively using ownCloud, I also got to hack and discuss with some people like Domme, of Tomahawk fame, this resulted in first steps towards a Qt 5 port for Mirall, and concrete planning steps towards a file manager integration, which is scheduled for ownCloud Client 1.5. We’re looking forward to FrOSCon 2014!

Full disclosure: I am a former FrOSCon organizers, and contributed to the Video Operations Center this year.

Replacing the SD Card Reader on a Raspberry Pi for 2.50 Euros

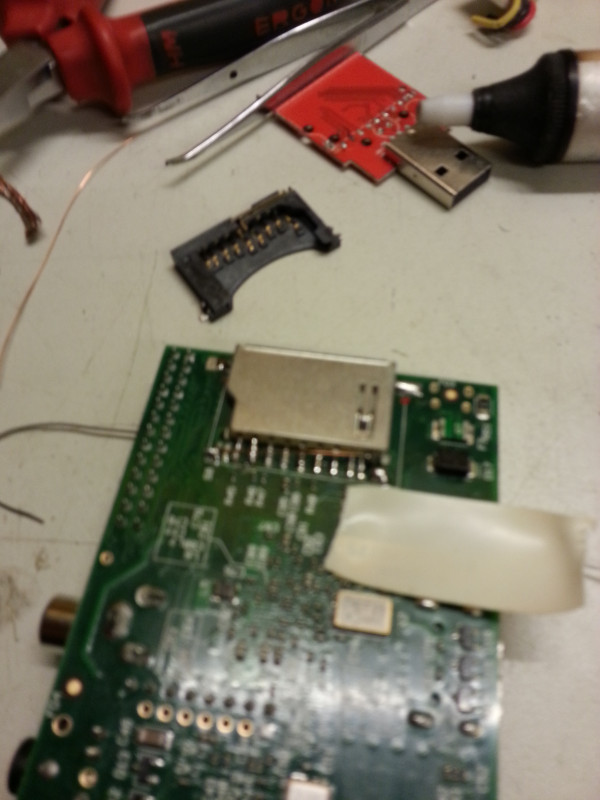
It is is dead Jim: The Raspberry Pi's cheap SD card reader does not cope well with the leverage effect.
It is is dead Jim: The Raspberry Pi’s cheap SD card reader does not cope well with the leverage effect.
A weak spot of the Raspberry Pi board in terms of physical robustness is its SD Card reader: I made the mistake of carrying the Pi around with an SD Card inside, and the leverage forces worked their magic. As a result, the readers plastic framework fractured, and the reader no longer embraced the card safely. This resulted in a behavior that can at best be described as unreliable.

So what should I do? Clearly I could reorder the SD card reader at one of the distributors, but it’s going to be expensive, and, more importantly, it’s going to be the same crappy reader that will most likely break again (unless your learn from your errors, which I rarely do). But the spare part itself is ridiculously expensive, some 6 Euros + shipping just for a spare part.

Provides our spare part: LogiLink Card Reader
Caveats: You should probably not try this as your first soldering project. Find help from someone with expertise.

Note that for simplicity, the new reader will ignore the read-only switch of the SD Card. The respective pads on the PCB will simply be shorted (If you want to go the extra mile, you can of course fix this properly). Also, not every card reader on the market is the same. Check how your reader is connected, and which pins serve which purpose.

Still with me? Well, luckily there is a cheap USB key card reader (affilate link) available which I aquired at at Amazon.de at 2.50 Euros, including shipping. Yes, it’s sad to deconstruct a completely working USB key because it’s cheaper than a spare part, but on the upside you gain a USB connector, an LED and a quartz crystal and a controller as free spare parts for your next projects.

Required Parts and Tools

Ready for unsoldering: uncoated USB card reader PCB
Ready for unsoldering: uncoated card reader
  • USB Card reader
  • Tin-solder
  • Enamelled Wire
  • Soldering iron
  • Desoldering wick
  • Desoldering pump
  • Opt: Volt meter
  • Opt: Pliers
  • Opt: Wire
  • Opt: Hot-melt gun

The process

Unsolder new Card Reader from USB Reader

Open the USB keys’ plastic housing by inserting a screw driver into the card slot and turn it by 90 degrees. Once you have gotten hold of the PCB, unsolder the LED and the quartz crystal first – they are in the way. Finally, unsolder the reader pin by pin. Be careful: the pins loosen easily, and if they fall off, you will have to replace them with a piece of wire, which makes the process more difficult.

Unsolder old Card Reader from RPi

Using pliers to cut off the connectors close to the reader gave good results. Use desoldering techniques for proper separation if still required. The more pin wire is left on the board, the easier the resoldering will be.

Resolder new Card Reader to RPi

The SD Card Reader on the Pi is connected via SPI. The general mapping of an SD Card to the SPI can be deduced from pin mapping at Wikipedia. The mapping of the pins remains the same with our chosen reader. However, there are four more pins as you can see from the close up on the right.

Old reader with pin mapping (brand-new Pi board).

As you can see, there are thirteen pins, but there are only nine connectors on the card. We need extra pins for detecting if a card is actually inserted (located on the pins to the right) and another to check if the card is notched (i.e. write-protected, located on the left).

Now we need to map the pin layouts to the new card reader. On our case, the pin mappings are identical. However, the new reader only has eleven pins, but we will be fine – just find the two additional data pins, which set themselves apart from the rest of the pins in height — both are located on the right hand side of the new reader (see the top most picture). The left one is the one you want to solder to to any of the ground pins using the the enamelled wire — we chose the second from the left. Finally, shorten the two left-most contacts pins on the PCB to signal the PI that the card is always on read-write (again, you can easily fix this yourself if you really want your OS to reside on a read-only card).

The result

Raspberry Pi with new SD Card Reader.
Raspberry Pi with new, more sturdy SD Card reader. The old reader module and the unsoldered USB key PCB still in the background.

Making it rock-solid

Use some solder to fixiate the reader on the sides, even though the card reader might not have extra spots to hold the solder tin. It will most likely still work. If you want to make sure your reader is really well-tied to the PCB, use a hot-melt gun and put some glue onto the new wiring (check if it works first, there is no going back!), as well as on the sides.

Credits

The project was suggested by and conducted with the invaluable help of @d3rp3t3r.

Netzladen-Besuche gesichert

Wie der Kölner Stadtanzeiger berichtet, ist die Nachtbuslinie nach Sankt Augustin (N6) bis 2007 gerettet. Die “rhenag” und die Stadt Bonn übernehmen die Lücken in der Finanzierung. Das bedeutet für mich, dass ich weiterhin bis nach 0 Uhr im Netzladen oder anderswo in Bonn versacken kann. Wär ansonsten auch sehr schade gewesen, darauf verzichten zu müssen.

Unglaublicher Leichtsinn

Diese Nacht war eine sehr schlaflose. Denn weil mir langweilig war, habe ich nocheinmal Kismet auf dem Access-Point auf dem Dachboden gestartet, nachdem ich etwas stärkere Antennen angebracht habe und ein wenig an der Leistung geschraubt hatte. Ich hatte mich ja über die verschlüsselten WLANs gewundert, die mir dort um die Ohren flogen. Seit dem “upgrade” fand ich jedoch ein weiteres mit dem unauffälligen Namen “Feuerzauber” — unverschlüsselt und offensichtlich eine Richtfunkstrecke der hier ansässigen GSG 9. Ich habe natürlich die Gelegenheit genutzt und zum Beweis ein Log mit “tcpdump” mitgeschnitten, das ihr hier nachlesen könnt (Passwörter habe ich maskiert). Anfragen an den WDR, RTL und Sat.1/Pro 7 sind bereits raus. So ein Leichtsinn muss an die Öffentlichkeit!